Looking Glass Documentation
Buy Looking GlassDiscord
  • Looking Glass User Guide
  • NEW! ✨Looking Glass Go✨
  • Displays
    • 🔮Looking Glass Go
      • ⚡Get Started with Looking Glass Go
      • 📱Using the Go Mobile App
      • 🔆Liteforms™
      • 🖥️Standalone and Desktop Modes
      • 🔌Power and LED States
      • 🪄Default Playlist
      • ⏭️What's Next?
      • 👜Accessories
      • ⚙️Advanced Playlist Creation
      • ⚙️Manual Firmware Update
      • ❓Common Troubleshooting Issues
    • 🔮Looking Glass 16" Light Field Displays
      • 🪄Looking Glass 16" Light Field Display (Landscape)
      • 🪄Looking Glass 16" Light Field Display (Portrait)
      • ❓Common Troubleshooting Issues
    • 🔮Looking Glass 32" Light Field Displays
      • 🪄Looking Glass 32" Light Field Display (Landscape)
      • 🪄Looking Glass 32" Light Field Display (Portrait)
      • ❓Common Troubleshooting Issues
    • 🔮Looking Glass 65" Light Field Display
    • 🔮Looking Glass Portrait
      • ⚡Get Started with Looking Glass Portrait
      • 🎇Demo Holograms
      • ❓Common Troubleshooting Issues
  • Software
    • 📚Overview
    • 🌉Looking Glass Bridge
      • ✨Using Looking Glass Bridge
      • 🪟Display Settings on Windows
      • 🍎Display Settings on macOS
      • 🐧Display Settings on Linux
      • 👷Troubleshooting
    • ⚙️Looking Glass Bridge SDK
      • 🪛Web Application Integration
      • 🔌Integrating Native Applications
      • 📓Native Function Reference
      • 🐦Looking Glass Core Migration Guide
    • 🔌Unity
      • 🚀Unity Plugin 4.0-alpha
      • ⚡Using Unity with Looking Glass
      • Setting up your Development Environment
      • Example Scenes
      • Prefabs
        • Hologram Camera
        • 3D Cursor
        • Dual Monitor Application
      • Script Reference
        • HologramCamera.cs
        • LKGDisplaySystem.cs
        • QuiltCapture.cs
        • Cursor3D.cs
        • OrbitControls.cs
        • BlockUploader.cs
        • MobileDMAController.cs
        • iOS Sample Scene Scripts
          • ChangeInteractionModality.cs
          • XYSlider.cs
          • XYSpotlight.cs
          • AudioRotateControl.cs
          • ModelController.cs
          • DemoIOSUIController.cs
          • PageHandler.cs
          • PageConnectHandler.cs
          • PageCalibrateHandler.cs
          • PageTestHandler.cs
          • DynamicAlcove.cs
      • Package Integrations
        • Built-in Render Pipeline Post-Processing
      • Developing for iOS
      • Depth of Field and Other Post-Processing Effects
      • Quilt Video Audio and Playback
      • Developing for Ultraleap Hand Tracking on Looking Glass
      • Looking Glass Pro (Legacy)
      • Additional Support
      • Change Log
    • 📽️Looking Glass Studio
      • 📚Using Looking Glass Studio
      • 🎬Hologram Video iOS App
      • RGB-D Photo / Video
      • Quilt Images / Video
      • iPhone Portrait Photos
      • Android Depth Photos
        • Samsung Portrait Mode
      • Light Field Photosets
      • Exporting Holograms
      • Troubleshooting
    • 👀Looking Glass Model Viewer
    • 🧊Looking Glass Blocks
      • ✨Convert any image into a hologram
      • ⬆️Uploading, editing and sharing Quilts
      • 🥽Viewing your holograms on different platforms
    • 🎨Other Creator Tools
      • 🍹Blender
      • 🔌Unreal Engine
        • 🗒️Change Log and Old Versions
        • 💽Installing the Unreal Engine plugin
        • 🎥Using the Unreal Engine Plugin
          • Using the HoloPlay Capture
          • Exporting Quilt Images and Video with Sequencer
        • Accessing HoloPlay Data with Blueprint Scripting
        • Packaging the Project
        • Unreal Engine 4 (Legacy Support)
          • Unreal Engine 4 Quick Start
            • Using the HoloPlay Capture
            • Exporting Quilt Images and Video with Sequencer
      • 🌐WebXR
        • 🔶PlayCanvas
        • 3️⃣3️⃣ Three.JS
        • ⚛️React-Three-Fiber
        • 🌈Spline
    • 🧪Experiments
      • 🔆Liteforms™
        • 🪟Get Started on Windows
        • 🍎Get Started on MacOS
        • 🧙Making Custom Liteforms
        • 🏪Configure Liteforms for Kiosk Setup
      • 📽️Media Encoder
        • ⏩Looking Glass Media Encoder
    • 🧑‍🤝‍🧑Third Party Apps and Tools
      • 🗺️ParaView
      • 🔬VTK (Visualization Toolkit)
      • 🗡️3D Slicer
      • 🔩Community Made Tools & Projects
  • Key Concepts
    • 🔑Hologram 101
      • 🎉Making great holograms
      • 🌎Holograms in the real world
      • 👾Holograms, but virtual
    • 🔍How does Looking Glass Work?
    • 📸Virtual Camera
    • 🧊3D Design Guidelines
      • Lighting
      • Post-Processing
      • Scene Composition
      • Materials & Textures
      • Performance
    • 💡Quilts
      • 🎬Quilt Video Encoding
    • 💡Light Fields
      • ⚡Linear Light Field Capture
    • 📽️Filming a Looking Glass
  • Tutorials
    • 📱Running Looking Glass Displays with iOS Devices
    • Ⓜ️Capturing Light Fields in Maya
    • 🧑‍🔬Using ShaderToy with Looking Glass
    • 🎨Sculpting with Adobe Medium and Looking Glass
    • 🔍Turn Videogames Holographic with Refract
    • 🖐️Building with Leap Motion
  • Legacy
    • Legacy Hardware
      • 🔻Looking Glass 8.9"
      • 🔻Looking Glass 15.6"
      • 🔻Looking Glass 8K
      • 🔻Looking Glass 16"
      • 🔻Looking Glass 32"
      • 🔻Looking Glass Pro
    • Legacy Software
      • 📡3D Model Importer
        • 3D Model Importer App Guide
        • 3D Model Importer App Reference
      • 🎭Diorama
        • Change Log
      • 🎞️Depth Recorder
      • 📸Lightfield Photo App
      • 🍍Looking Glass Core Overview
      • 🍽️Looking Glass Core SDK
        • C API Overview
          • HoloPlayCore.h
            • State Functions
            • General-Query-Functions
            • Device-Query-Functions
          • libHoloPlayCore.h
          • HoloPlayShaders.h
      • 🔰Looking Glass Core JS
        • API
          • HoloPlayCore.Client
          • HoloPlayCore.Message
          • HoloPlay Service Related
          • examples
  • 💬Contact Us
  • 🛠️FAQ & Troubleshooting
Powered by GitBook

Follow us

  • Twitter
  • Instagram
  • LinkedIn
On this page
  • Requirements
  • Introduction
  • teps

Was this helpful?

  1. Tutorials

Using ShaderToy with Looking Glass

PreviousCapturing Light Fields in MayaNextSculpting with Adobe Medium and Looking Glass

Last updated 11 months ago

Was this helpful?

Requirements

Introduction

This post is written in collaboration with David Gallardo. You can find him on Twitter, or Youtube. Shadertoy is a popular website created by Pol Jeremias and Inigo Quilez, where shader programmers submit hundreds of shaders every day. In this tutorial, we'll explain how to convert those creations for the Looking Glass portrait. Some programming and basic linear algebra knowledge is needed.

‍

Some programming and basic linear algebra knowledge is needed.

Fun Fact, some of the Holograms you've seen in the Looking Glass Portrait's Demo reel were actually made in Shadertoy! You can check out Protean Clouds by Nimitz here! 💡Make sure to follow proper rules for crediting and attribution! Usually shaders on Shadertoy will have the license at the top of the main file!

teps

1. Rendering a quilt

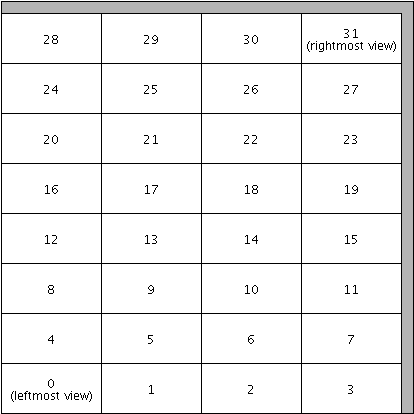
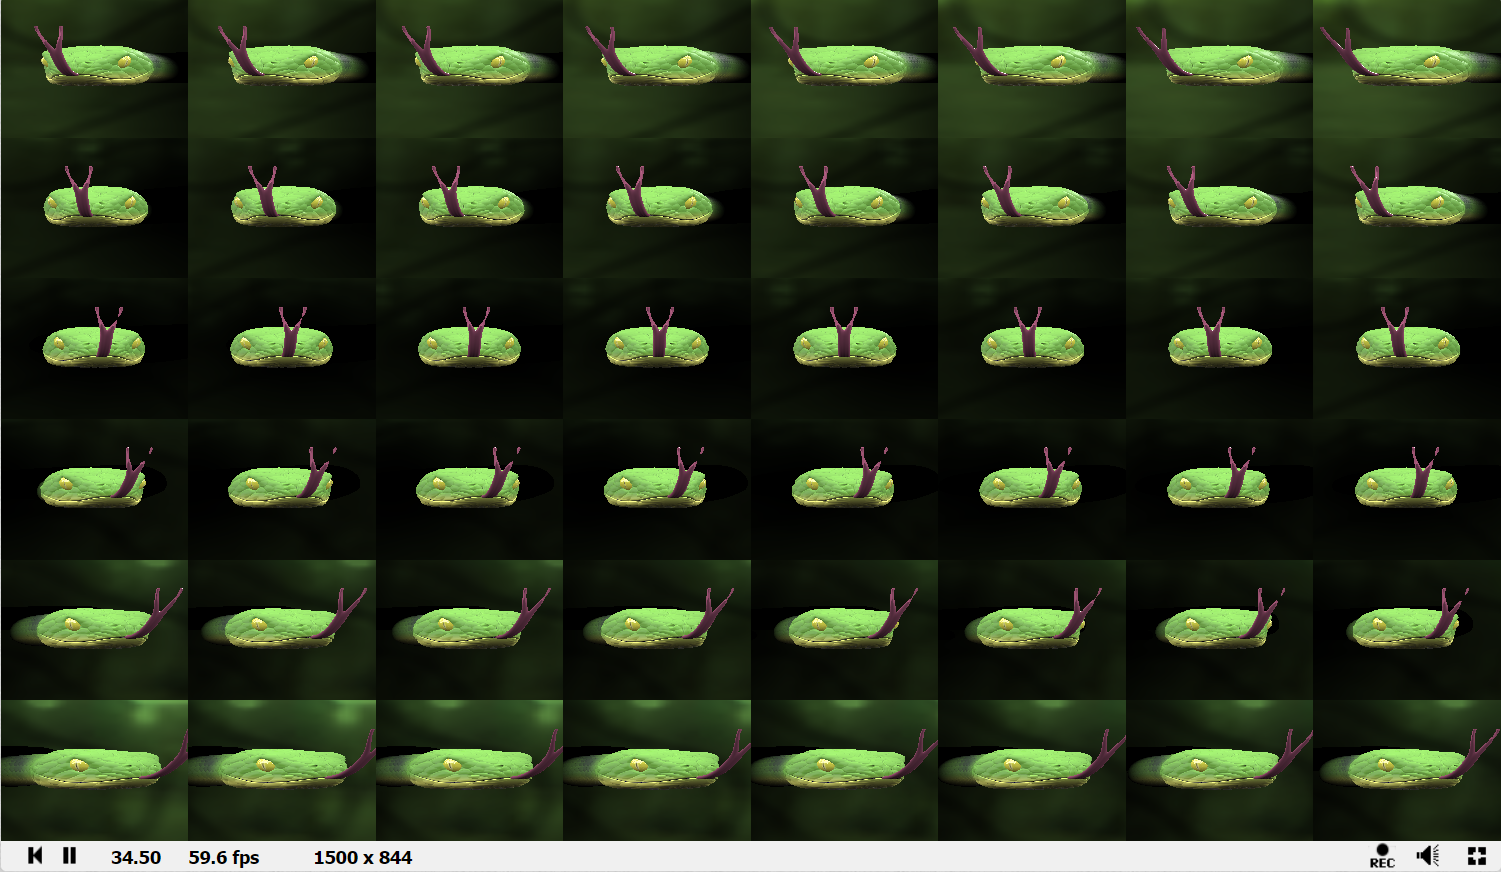
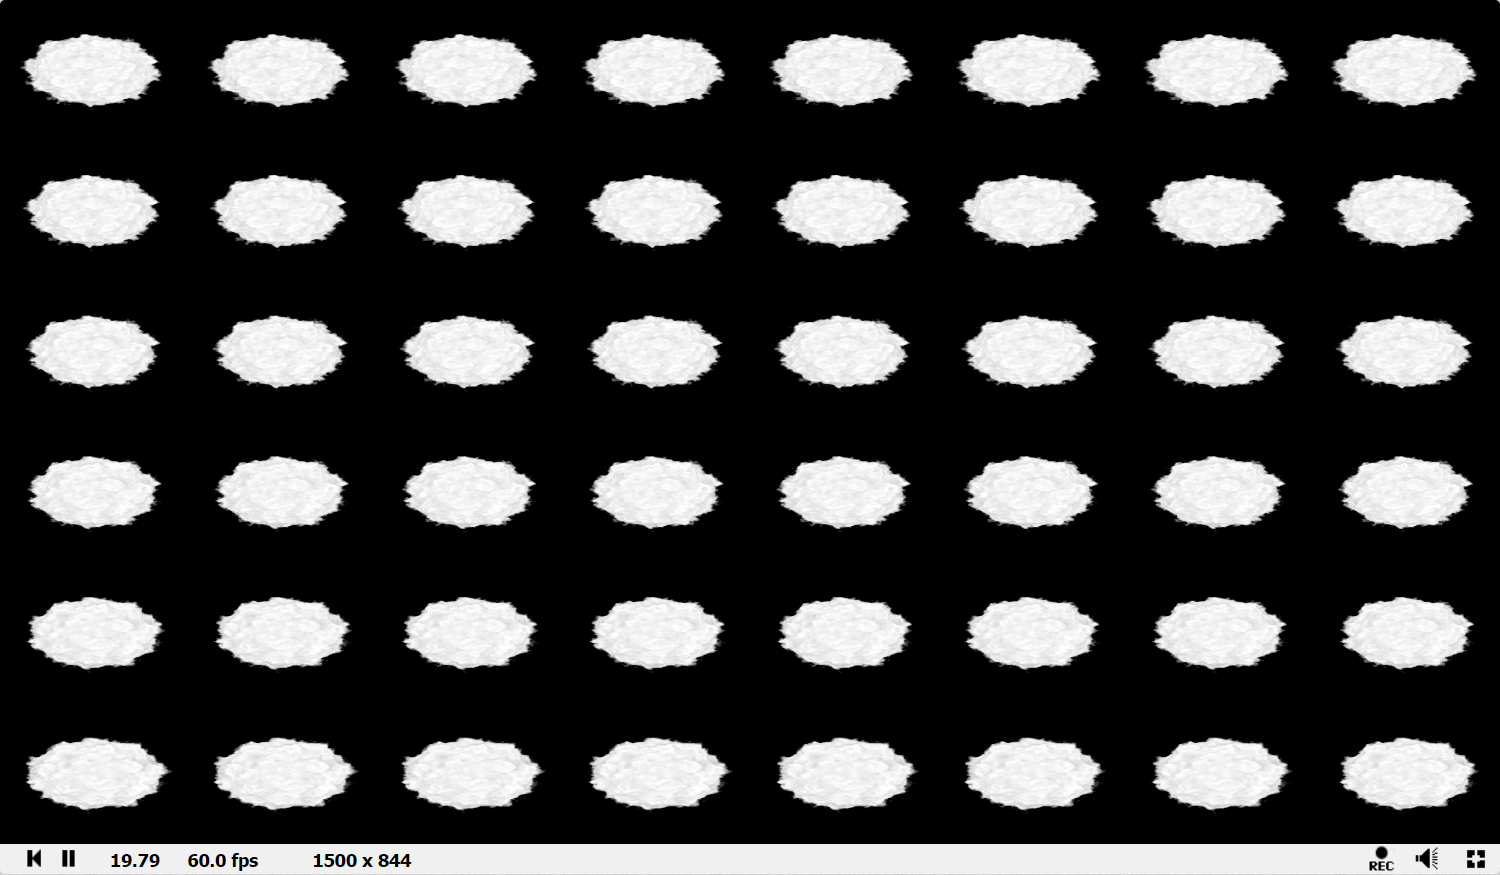
In order to have the best visual result, you should directly render a Quilt and not an RGB-D image. Quilts allow for better handling of depth and occlusions, but also lighting and specular highlights. In these examples we'll be using a technique called ray tracing to generate our images and then combine them into a quilt. A quilt is an array of 2D images, where the bottom left is the left-most image, and the top-right is the right-most image.

2. Getting started with a shader built for VR

While only 0.5% of the shaders in Shadertoy support VR, they are easier to convert. For this tutorial, we'll start with VR Shaders. Converting a Shadertoy to work on the Looking Glass displays is complex. The goal is to generate a light field, but a ShaderToy offers a very minimal framework, which means that rendering code or camera management is coded from scratch inside the shader, so it’s not possible to automatically convert a shader without minimal programming skills and motivation to understand how each shader works. Each shader will have its own challenge during the conversion. ‍ VR Shaders are easier because they are the only ones to have a 3d interface. A VR shader must implement a function like this, and this function is very easy to call from a light field generator.

void mainVR( out vec4 fragColor, in vec2 fragCoord, in vec3 fragRayOri, in vec3 fragRayDir )
  • fragColor is the final color for the pixel,

  • fragcoord (rarely used in VR) is the coordinate in pixel,

  • fragRayOri is the start position of the ray and

  • fragRayDir is the normalized ray direction.

‍

In theory it’s very simple - but there is a catch. In VR on Shadertoy, the objective is to have a panorama around you and the coordinate zero is the initial position of the VR headset. The software is tracking the headset and modifies the ray direction and position of each ray depending of the position rotation of the headset. On a Looking Glass we don’t want a panorama, we want to put an object in a box (the screen). And it’s important to have the object placed precisely where it should be.

‍

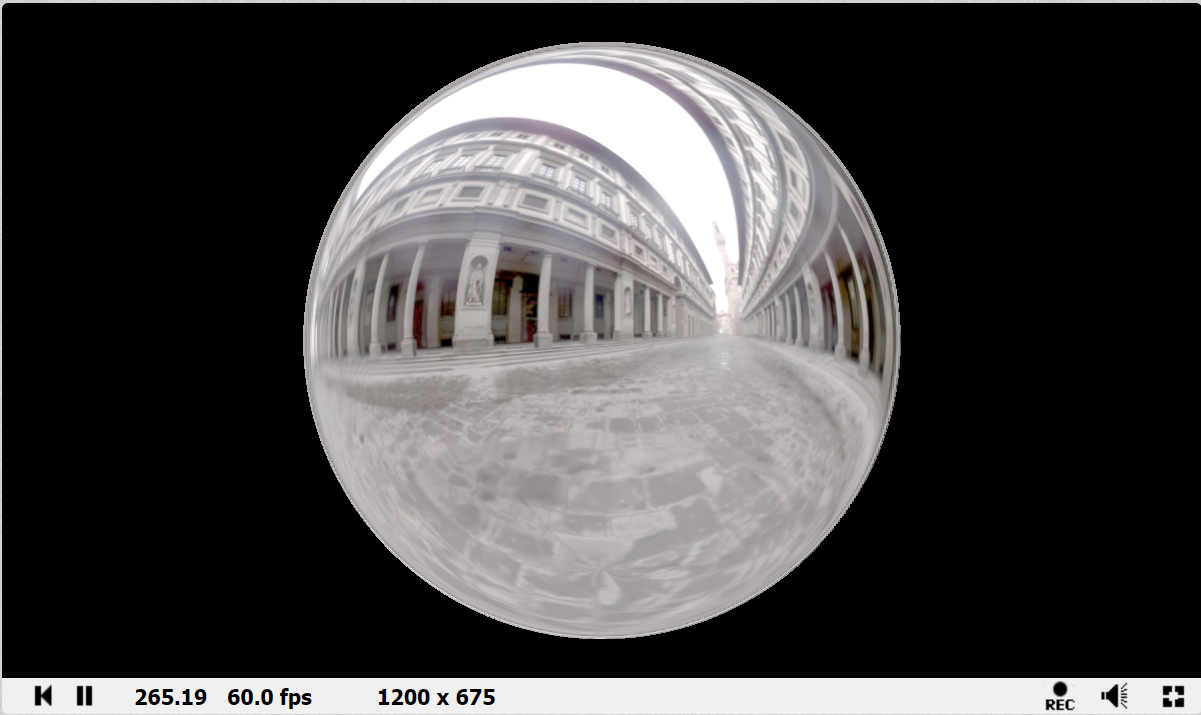
Let’s start with a simple shader that we created for this tutorial.

‍

Open this shader with your favorite browser and “fork” it. To do this, you will need a Shadertoy account and to be logged in. When you Fork the shader it will create a new copy of the original shader, you can rename it if you don’t like the name (the name needs to be unique among every shader in shadertoy, sometimes finding a unique name may be a challenge).

Comment out the original “mainImage” function and copy paste the following at the bottom of the source and replace it with the snippet here.

 #define QAA	2                                     

const float	sideAngle = radians(35.0);
const float	horizontalAngle = radians(14.0);
const float	cameraSize = 2.0;
const float	aspectRatio = 0.75;
const vec3  	VROffset = vec3(0, 0, 9);
float quiltColumns	=	8.;
float quiltRows		=	6.;
void mainImage( out vec4 fragColor, in vec2 fragCoord )
{
    vec4	accColor = vec4(0.);
    for( int m = 0; m < QAA; m++ )
    for( int n = 0; n < QAA; n++ )
    {
        // pixel coordinates
        vec2 o = (vec2(float(m), float(n)) / float(QAA) - 0.5) / iResolution.xy                                                                                 ;
		
		vec2	coord = (fragCoord / iResolution.xy  + o) * vec2(quiltColumns,quiltRows);
		vec2	fract = fract(coord);
		vec2	floor = floor(coord);
		float	imageId = floor.x + floor.y * quiltColumns;
		float	valueId = imageId / (quiltColumns * quiltRows - 1.);
		float	dist = (cameraSize / 2.) / tan(horizontalAngle / 2.);
		float	minCam = -(cameraSize / 2.) - tan(sideAngle / 2.) * dist;
		
		vec3	camPos = mix(vec3(minCam,0,dist),vec3(-minCam,0,dist),valueId);
		vec3	screenPos = vec3((fract.x-0.5)*cameraSize,(fract.y-0.5)*cameraSize/aspectRatio,0);
		
		vec3	dir = normalize(screenPos - camPos);
		vec4	color;
		mainVR(color, fragCoord, camPos - VROffset, dir);
		accColor += clamp(color, 0.0, 1.0);
	}
	fragColor = accColor / float(QAA*QAA);
}

view rawshadertory_to_quilt.glsl on Github.

If you are making it for a landscape Looking Glass display, it's recommended to change the QuiltRows and QuiltColumns parameters to match the device you're targeting. You can find our standard quilt dimensions here.

The cameraSize is the horizontal size of the screen in the shader’s world space. It is a very important value and I probably should have called it screenSize instead. In our simple example we have a sphere with radius of 1 unit (So its diameter is 2) and to fit the whole sphere horizontally, you will need to set the cameraSize to at least two. If you find the sphere too big on screen you just have to increase the value.

The tricky part here is the offset: Here in the mainVR, it’s easy to see that we have an offset of (0, 0, 9) applied, so we have two solutions here:

  • the first choice is to remove the offset here (in mainVR)

  • the second possibility is to counter the offset by setting the VROffset with the same value

Usually I prefer the latter because the less changes in the original code the better.

So if you followed all the steps you should have a shader equivalent to this shader. You can now directly jump to the “How to make a video” section to see how to generate a video to be able to view it on your holographic display.

3. Converting shaders that weren't built for VR

Shadertoys that do not have VR support are more difficult and less intuitive to adapt, but most of the time it’s not that hard even if there is no standard on how to write code on shadertoy. Most shaders are computing in the mainImage function the ray origin and the ray direction, so you have to add additional parameters to mainImage “_ro” and “_rd” and override the value computed by the original shader by the new values in parameter, just before these values were used for the raymarching or raytracing. ‍ I converted a couple of famous shaders, I invite you to see how I converted them. You can click on the images to be redirected to the converted shadertoy.

‍

DangerNoodle

Cloud SpikeBall

Diorama

4. Exporting a quilt video

ShaderBoi is a tool with lots of cool features and one of them is that it’s very easy to export an “online” Shadertoy in video at any custom resolution.

You can download it from directly from the prerequisites section above, or from ShaderBoi.net. You will also need to download FFmpeg, the instructions for this can be found in the readme file that is included with ShaderBoi.

To use it, you just have to open a command prompt and type command like this:

sboi -i Nlj3zm -s 2048x2048 -c rec -l 5 -y -h -o HyperDodecahedron.mp4

“-i” is for the shadertoy ID, the example for this shader toy https://www.shadertoy.com/view/Nlj3zm the id is “Nlj3zm”

“-s” is for resolution, we recommend 3360x3360 or higher for final holograms, but 2048x2048 works well for testing with the looking glass portrait.

“-c” forces the cache to refresh, it’s really important because without this flag, even if you modified your shader in shadertoy it will still use the one cached on your computer.

“-l” is the length in seconds. I advise you to choose a small number when experimenting.

“-h” is an optional parameter to export in H265 instead of H264. It gives you less compression artefacts with a smaller bandwidth, but some old video players won’t play it, so remove the option if you have issues.

You can use sboi help to know all the options and sboi rec help for all recording options.

🧑‍🔬

Looking Glass Bridge

The connection between your computer and your Looking Glass.

Looking Glass Studio

A holographic media player.